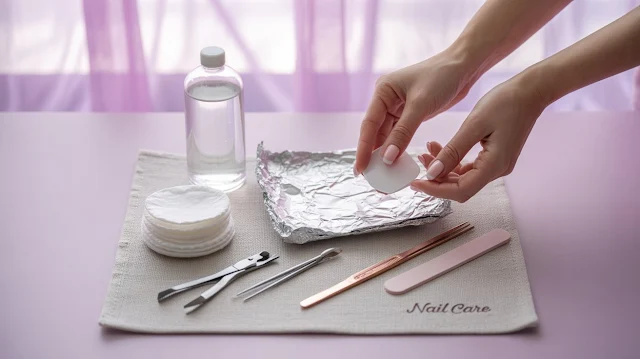
Trying to remove acrylic nails at home can go very wrong fast. Without the right tools or process, you risk peeling, damaging your natural nails, and making a mess. But if done correctly, it’s entirely possible to take them off safely without a salon visit. Whether you’re prepping for a fresh new set or just giving your natural nails a breather, this guide has you covered.
What You’ll Need: Full Tools Checklist
Before you begin, gather these essentials. Having everything ready helps avoid damage and makes the process smoother.
- Acetone (100% pure)
- Cotton pads or balls
- Aluminum foil or nail clips
- Nail file or buffer
- Cuticle pusher or orangewood stick
- Nail clippers
- Small bowl (optional for soaking)
- Cuticle oil
- Petroleum jelly (optional, to protect skin around nails)
Method 1: Acetone Soak Method (Most Effective)
This is the safest and most widely used removal method by professionals. It works by softening the acrylic for easy, damage-free removal.
Steps:
- Trim your acrylic nails using nail clippers to reduce length.
- File the surface layer of the acrylic gently to help acetone penetrate.
- Apply petroleum jelly around your fingertips to protect your skin from acetone.
- Soak cotton pads in acetone, and place on each nail.
- Wrap each nail with foil or use a clip to hold the cotton tightly in place.
- Wait for 25–30 minutes. Patience is key—don't rush.
- Check one nail: if the acrylic is soft, gently push it off using a cuticle stick.
- If needed, rewrap and soak for another 5–10 minutes.
- Buff off residue and finish with cuticle oil for hydration.
Method 2: Warm Water & Oil Soak (No Acetone)
Prefer to skip chemicals? This method is gentle and works well if you're not in a rush. It’s especially good for those with sensitive skin or brittle nails.
Steps:
- Mix warm water and olive oil (or coconut oil) in a small bowl.
- Soak your nails for 30–40 minutes.
- Gently lift the acrylic edge with a wooden stick if it doesn't lift, soak again.
- Repeat the process as needed.
While it may take longer, this method is safe and moisturizing. You can even add a few drops of essential oil for a mini spa experience.
Method 3: The Dental Floss Technique (Use with Caution)
This is a last-resort method that works only when done very carefully and with another person’s help. Never try it alone it requires precision and patience.
Steps:
- Use a cuticle stick to gently lift the edge of the acrylic.
- Have a partner slide dental floss under the lifted edge.
- Slowly work the floss back and forth while gently pulling upward.
This method may be faster but comes with risk. If you feel resistance, stop and try a soak method instead.
Method Comparison Table
Aftercare for Natural Nail Health
After removal, your natural nails need recovery time. The right aftercare ensures they stay strong, smooth, and healthy.
- Apply cuticle oil twice daily to restore moisture.
- Use a strengthening base coat or biotin-rich serum.
- Avoid nail polish or acrylic reapplication for 5–7 days.
- Lightly buff the surface only to smooth it, not remove layers.
- Use a fragrance-free moisturizer on hands and nails.
Pro Tip: For deeper repair, wear moisturizing gloves overnight with your favorite hand cream.
Mistakes to Avoid
Many people damage their natural nails by skipping essential steps. These are the most common mistakes to avoid:
- Pulling or peeling off acrylic nails manually
- Using sharp metal tools to scrape or pry
- Rushing the soak time or removing too soon
- Reapplying acrylics or polish immediately
- Ignoring dryness and skipping moisturization
Always go slow and be gentle. Your natural nails are delicate and can take weeks to fully recover.
Frequently Asked Questions
Can I remove acrylic nails without acetone?
Yes, the oil-and-water soak is a chemical-free method that’s slower but gentler.
Is it safe to use nail polish remover instead of acetone?
No. Most polish removers aren’t strong enough to break down acrylic effectively.
How soon can I get a new set after removal?
Wait at least 5–7 days to let your nails breathe and recover naturally.
What’s the best way to prevent nail damage during removal?
Never peel acrylics. Always soak and push gently using proper tools.
Is the dental floss trick safe?
Only if done carefully with assistance. It's not recommended for solo use or first-timers.
Social Media Trend Alert
Many TikTok and Instagram hacks for acrylic removal are misleading or risky. While they might seem fast, they can seriously damage your nails or skin barrier.
Trends to be cautious of:
- Steaming nails in ziplock bags
- Using vinegar or lemon juice
- Using a hair dryer to soften acrylic
Stick to proven methods. Viral hacks often skip safety and long-term care.
Final Thoughts
Removing acrylic nails at home is completely doable when you use the right tools, technique, and patience. Follow one of these proven methods and focus on aftercare. Your nails will thank you.
Whether you prefer the classic acetone soak or a gentle oil-based method, what matters most is taking it slow and keeping your natural nails healthy.
This isn’t just about removing a nail set, it's about treating your natural nails with care so they grow back stronger and more beautiful than ever.


.jpeg)
Post a Comment